Category Archives: Training Tips

Articles, Videos, and Quick Training Tips for Obedience and Behavior

Teach Your Dog How to Greet Guests Without Jumping on Them

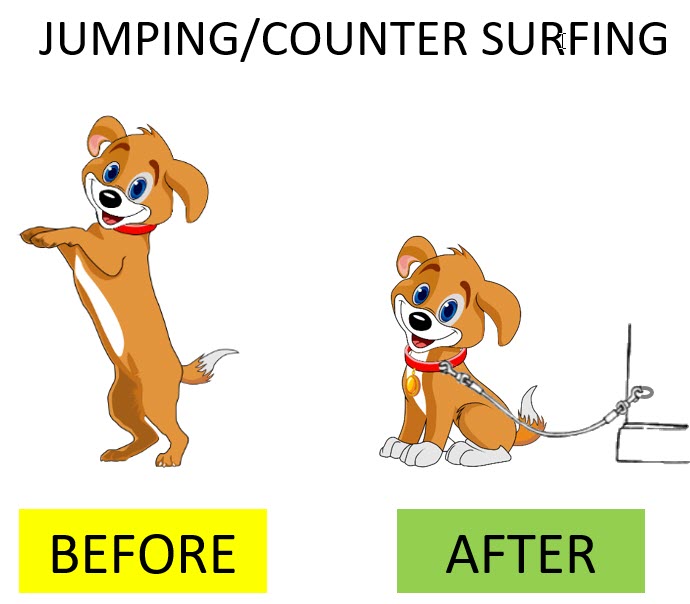
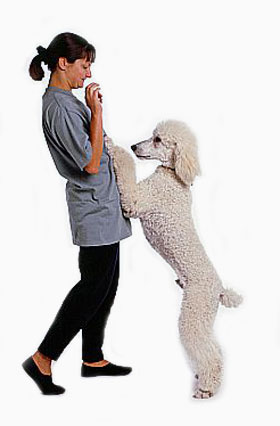
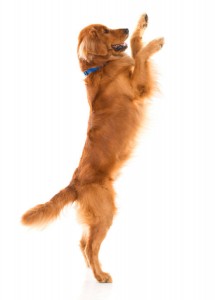
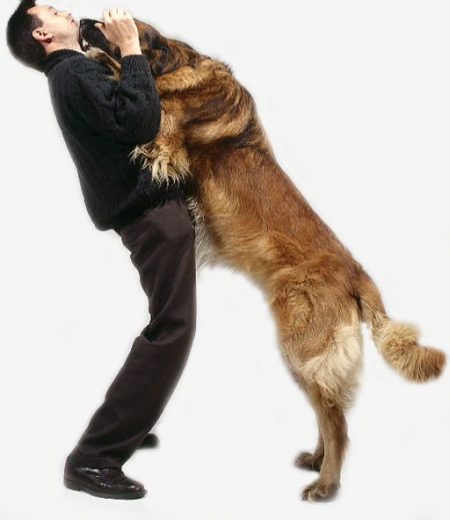
Why do dogs jump on you to say “Hello?” Because they’re excited and happy to see you! Jumping up on you is a dog’s way to get your attention and express its enthusiasm! While jumping to greet is a natural, normal way for dogs to greet other dogs, most people would prefer that their dogs greet them calmly, with paws on the floor. The good news is that you can teach your dog how to greet guests without jumping on them by using this simple technique.

Unfortunately, all too many people use ineffective, time-consuming, or harsh methods to teach their dogs not to jump on them and their guests.

The good news is that training your dog to greet calmly with all four paws on the floor may be quickly and easily accomplished using positive, dog-friendly techniques and tools.

In order to implement this technique, you’ll need a 3’ chew-proof tether or tie-down, and a comfy bed or blanket for your dog to lie on.

Where to Locate the Tie-Down

Locate the bed and tie-down near the front entrance to your home, but not at the front door. The anchor point should be about 6-8 ft. from the main entrance. Avoid placing the tether in a narrow hallway.

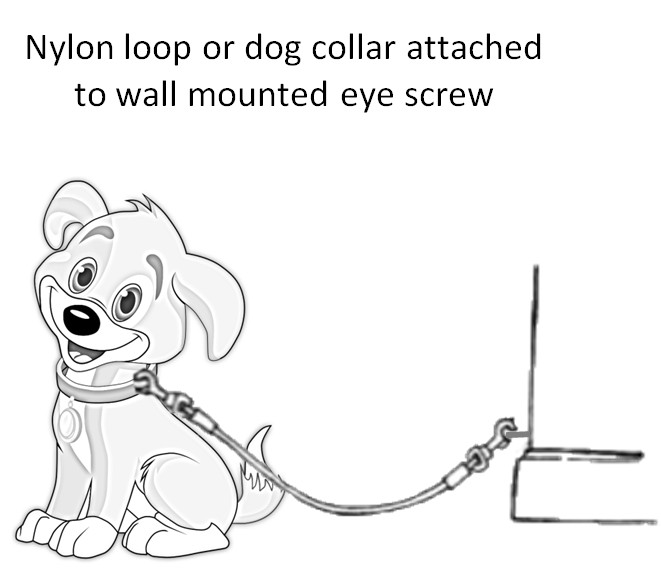
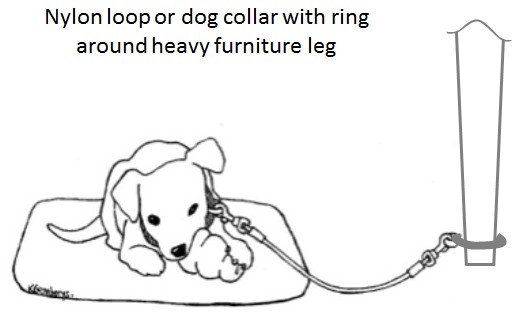
Securely attach the tie-down to a heavy piece of furniture, the bottom rail of a nearby stairwell, or use an eye-bolt to secure the tie-down into a nearby wall.

How to Teach Polite Greeting Manners

The objective of this technique is to teach your dog that having his paws on the floor means he can receive attention from people, but that jumping on people makes them go away.

Begin the exercise by knocking on the door, and ringing the doorbell. Once inside the door, pay attention to your dog’s paws. If all four paws are on the floor, your guest can pet your dog, and even give him treats.

If, at any point, your dog’s paws leave the floor, your guest should immediately turn and quickly walk away or exit the front door. Wait two minutes, and then repeat the exercise.

Work this setup many times on different occasions with a variety of people over a period of several weeks. If you and your guests are consistent with your responses, your dog will soon learn that “all four on the floor” pays, and that jumping makes the person go away. This exercise takes practice and consistency, but it works remarkably well.

After several weeks of consistent practice and calm greeting behavior, you can try this same exercise without the tie-down. If at any time your dog starts to jump again, simply go back to using the tie-down until he stops.

Plan Ahead for Best Results

Teaching a dog not to jump to greet requires that you plan ahead for guests, and attach the tie-down to your dog before they enter the home. Be proactive. Let your guests know that your dog is in training, and ask them not to pet, treat, or pay attention to your dog when he is jumping up. Remember that your dog gets paid with petting, attention, and occasional treats, only when “all four are on the floor.”

With consistent practice, your efforts will pay off. Every time your dog chooses a calm, controlled greeting over a rough and rowdy jump-fest, you’ll be rewarded many times over. Happy training!

Deter Puppy Play Biting and Mouthing Using the Tie-Down Technique

Rough-housing and play nipping is the way puppies play with their litter-mates. Although puppies have sharp teeth and nipping can hurt, the intention is always play, and never meant to harm. Contrary to what you may have heard, you don’t need to inflict pain to stop your puppy from biting and mouthing. There’s a very simple, tried-and-true technique you can use to deter puppy play biting and mouthing, and teach Fido not to put teeth on human skin or clothes. It’s called the Tie-Down Technique.

Teach Bite Inhibition to Your Pup

Puppies get their first lessons in bite inhibition from their mother and litter-mates. If a puppy bites too hard, his play buddy yelps, stops playing, and leaves. Mother dogs usually freeze, and if that doesn’t work, they may growl or even nip the pup to stop the offensive biting.

Though most puppies learn bite inhibition (how to mouth and nip with a soft mouth), some puppies are taken from the mom and litter-mates too soon, or don’t have enough siblings with which to learn bite inhibition. These puppies may nip harder because they haven’t learned how to be gentle.

The good news is that puppies that have a “hard mouth” can be taught to have a “soft mouth.” However, instead of learning bite inhibition from their mothers and litter-mates, they learn it from us.

The following method works well because it mimics the kind of response a pup would receive from its mother or litter-mates.

Use a 3-ft, Chew-Proof Tie-Down

Provide a nice bed or comfy pad for the pup in an area that is easily accessible.

Next, attach a 3 ft. long, chew-proof tether or tie-down to your puppy’s harness or collar. Attach the other end of the tie-down to a large, sturdy piece of furniture, or mount it to a wall-mounted eye screw. (Please refer to the graphic below for more information).

Implement the Tie-Down Technique

Now, gently start petting your dog on the chest and behind the ears. All the while, speak to your puppy in a soft, calming tone of voice.

The instant your puppy puts its mouth on your body, let out a loud, high-pitched “ouch!” and then quickly remove your hand, turn, and walk away. Please note: The mouthing or nipping does not need to be painful. Your objective is simply to teach your puppy that it’s unacceptable for its mouth/teeth to touch any part of your body at any time. Show him that nipping results in unpleasant consequences by “turning off” any attention and social interaction with you.

Up the Ante

Wait about two minutes. Pick up a favorite chew toy, and walk over to your dog (still on tether). Tell your dog to “Sit.” Once your dog sits, offer him the chew, and say “Take,” but don’t let go of the chew. Hold onto the chew with one hand, while you soothingly pet your dog with the other hand.

Alternate which hand does the petting, and which one has the toy or chew. As long as your puppy’s teeth are on the chew, continue telling him how good he is. This is a great way to teach your pup what he should be doing – mouthing the chew, rather than your hand.

The very second that your puppy’s mouth leaves the chew and touches your hand, loudly yelp “Ouch!” and walk away with the chew. Remember that the nipping doesn’t need to hurt, and that you must respond to mouthing instantly. By reacting this way, you’re teaching your puppy that it’s “good” when he puts his teeth on the chew, but that it’s not “good” when he puts his teeth on you.

Ignore your puppy for about two minutes, and then repeat this exercise. Do this 5-10 times, and then take a break. It’s best to pet for short periods of time. The longer you pet your pup, the more likely he is to get excited and start to nip. Always quit while you’re ahead and end on a positive note.

Practice Regularly and Be Consistent

All family members must be consistent and immediate with their responses. Mouthing or nipping must elicit a sharp, “Ouch!” and the end of something pleasurable…namely your attention or the chew toy. Expect that it will likely take 2-3 weeks to teach your puppy not to nip. Eventually, your puppy will get the message: “If you can’t play nice, I won’t play with you at all.”

Teaching your puppy not to nip requires time, patience, and consistency. Everyone in the family needs to work with your puppy in the same way. Taking the time to address puppy nipping and mouthing as soon as it arises makes it easier to eliminate, and is much easier than trying to resolve it later in life.

Benevolent Leadership

Dogs view the pack as a hierarchy, and therefore need to know where they fit within the pack. Some dogs are dominant in nature; some are submissive. Dominant dogs may be pushy, and demand your attention by barking at you, or nudging you for attention. Submissive dogs, on the other hand, are more likely to follow your lead and look to you for guidance. Regardless of temperament, every dog benefits from consistency, structure, boundaries, and benevolent leadership.

Dogs are more comfortable when they have confident, kind, and consistent leadership
from all family members. Leaders control access to all things wonderful: food, treats,
balls, toys, affection, and walks. Teaching your dog to work for the things he or she
enjoys is much like teaching a child to “Say Please.”

When you implement this “work to earn” protocol, you’re asking for polite behavior,
and teaching your dog to defer to your guidance. You’re also teaching impulse
control, and helping your dog understand that “good things come to those who wait.”

Good leaders are calm, confident, and fair. The following methods will teach your dog good manners, add structure and stability to his life, and establish you in the leadership role.

1. Teach your dog to “Sit” and “Watch” before going out or coming in any door.
Leaders exit doors and gates first. Bumping into your legs and rushing past you are
rude
and dangerous. Once through the door, turn to your dog and tell him “Okay!”

2. Cue your dog to “Sit” or “Down” and “Watch” to earn everything of value; this
includes meals, treats, games, and petting
. Games should be initiated and ended by
the handler, not the dog. Do not play tug of war, or any other game that pits the dog’s
strength against you unless your dog will easily and willingly release the object.
Retrieving and hide and seek are great alternatives.

3. Leaders control all social interactions. Leaders decide when to initiate and end play
(toys get put away after playtime). A leader also decides when to give others
attention. It is best to walk away from, or completely ignore nudging, whining,
pawing, or barking for attention. Leaders also control whom the pack meets. Dogs
don’t decide when to greet other dogs/humans. We do!

4. When feeding, place the food down and leave it for about 5 minutes. Cue your
dog to “Sit,” place the bowl on the floor, tell him to “Watch,” and then release him
with an Okay!” If he gets up prior to being released, pick up the food bowl and try
again. Pick up the food after approximately five minutes, and don’t leave it there for
him to eat at a later time.

5. Dogs should not control any spaces in your home. Be careful not to step over the
dog in the house. If he is in the way, he must move. Slowly and gently shuffle your
feet into him and say “Excuse” or “Scoot.” You may also want to barricade access to
stairs since some dogs like to sit on the landing and “survey”
their domain.

6. You should be able to touch your dog’s body (tail, paws, back, ears, etc) without
him fidgeting or becoming upset (growling or nipping)
. Dogs should learn to stand
still for regular grooming sessions, including toenail cutting, brushing, and teeth
cleaning. If your dog shows signs of distress, you can use counter conditioning to
help him enjoy the grooming process.

7. In a dog’s mind, height determines hierarchy. There should be no getting up on
furniture without you. Being on furniture or beds is a privilege. If you do allow your
dog up, then he must wait to be invited up (after a sit). If your dog is allowed to sleep
in your bedroom, he or she should not be on the bed unless there are ZERO serious
behavior concerns, (marking, aggression, separation anxiety). If you allow your dog
to sleep in your room, then provide a crate or comfy bed on the floor. Ideally, dogs
should sleep in a crate away from your sleeping area at night. This is especially true
for dogs that don’t obey or that have problems with separation anxiety.

8. Give your dog several brief, enjoyable obedience sessions daily (5-10 minutes
long)
. Use positive reinforcement, verbal praise, and keep the session moving.
Introduce fun new tricks and games from time to time in order to keep things fresh
and interesting for your dog. Obedience training is a great way to develop a lifelong
bond based on trust and mutual respect.

9. Practice brief “Down-Stays” frequently—the more the better. This exercise helps
to ground and calm dogs; it also conveys the message that you are leader. The
“down” comes in especially useful during times that your dog is out-of-control or not
paying attention to you. For especially trying dogs, you may need to cue a short 30-
second “down” as many as 10 times per day (initially). If your dog has trouble staying
in position, you can step on the leash until you are ready to release him with “Okay!”

10. Try not to repeat your vocal cues. Every time you do this, you communicate to your
dog that it is okay to ignore you. Naturally, your dog will believe that it is okay to
wait for a second, third, or fourth cue before obeying. Instead, say the cue word
once.
If your dog does not respond within two seconds, gently maneuver him or her into
position. Do not say “good” or treat. Rewards must be earned!

11. Commands should be given with in a firm, but calm tone of voice. Try not to raise
your voice at the end of a cue word. If you sound like you are asking, rather than
telling, the answer is likely to be “no.” Likewise, interruptions should be given in a
firm tone of voice, and praise should be offered with a pleasant, higher pitched, happy
tone of voice.

12. Refrain from always giving “free” attention. From time to time, have your dog
“earn” your attention, praise, and affection. This can be as simple as cueing your dog
to “come” to you, and “sit.” Once he comes, you can give him lots of warm verbal
praise, attention, and affection. He will value you and your attention even more when
he must earn it occasionally.

Implement the “Say Please” or “Benevolent Leadership” program as soon as you bring your dog home. Cue your dog to “Sit” or “Down” as a way to “Say Please” for anything he values. By requiring your dog to wait politely for food, toys, balls, attention, walks, you establish yourself as leader of the pack, which means your dog will look to you for guidance. And that, in turn, makes for a more relaxed dog.

The more consistent you and other family members are about implementing the
“rules,” the more quickly your dog will master them. With a little time and patience,
you’ll have a calmer, happier, and more obedient dog. Happy training! 

Aromatherapy: The Benefits, How it Works, and How to Use It

The term aromatherapy refers to the therapeutic use of aromatic oils, or “essential oils.” Essential oils are the concentrated aromatic essences extracted from plant sources, such as woods, flowers, fruits, stems, leaves, and resins.

Aromatherapy is an effective complementary therapy to training and behavior modification because it is beneficial in alleviating many conditions, such as anxiety, stress, and depression.

There is an undeniable connection between smell and memory in both humans and canines. Because canines have an incredibly sensitive nose, it takes only a very dilute concentration of essential oils to have a powerful effect. Breathing in these scents eases stress by activating positive emotional responses from the part of the brain that controls memory and emotion. Lavender and chamomile affect the central nervous system, helping to alleviate stress and to engender calming and grounding.

Aromatherapy is popular because it’s gentle and effective without being costly. When used properly, there is virtually no risk of serious side-effects, which is not the case with many prescription drugs.

How to Use Aromatherapy on Your Dog

Caution: Never allow your dog to consume any essential oil (whether diluted or not), and do not use essential oils on pregnant or seizure-prone dogs without first checking with your veterinarian.

The safest, most effective way to use aromatherapy is to spray it on a bandanna that your dog wears around his neck (check out our collar and bandanna in one!)

If you have a dog that is nervous/anxious/stressed at home, place an aromatherapy diffuser in the room where your dog spends the most time. You may also wish to spray your dog’s bedding to make him more comfortable. This can be especially helpful during any major transitions (when you bring your dog home, after a move to a new home, when you are introducing a new pet to your dog, etc.)

How does aromatherapy help my anxious dog?

While the right aromatherapy blend can be extremely beneficial, it isn’t necessarily a cure-all for your dog’s stress and anxiety. There is no quick fix for most anxiety-related behavior. In order to resolve your dog’s anxiety/fear, you first need to understand what’s causing it.

Anxious, aggressive, or fearful behavior is sometimes caused by an underlying medical concern. If your dog is constantly fearful, stressed, or anxious, I strongly encourage you to take your dog to the Vet for a thorough check up.

If your dog is given a clean bill of health, then it’s time to consider behavior modification training. An experienced, reputable, positive reinforcement-based trainer should be able to accurately assess and address the specific triggers that are provoking your dog’s stress and anxiety.

As a trainer and behavior consultant, I’ve helped highly stressed/fearful/anxious dogs for more than 15 years. Whether the problem is leash reactivity, excessive alert barking, destructive chewing, reactivity to loud noises, or aggression around strangers, the root issues are usually fear and anxiety.

I’ve found that integrating natural calmatives (primarily aromatherapy) into the behavior modification process has been incredibly valuable because it calms the dog’s mind, allowing him to unlearn his habitual anxiety/fear-driven responses, and affords him the ability to learn a desirable replacement behavior in response to fear-provoking stimuli.

In what situations might calmatives be helpful to your dog?

• Anxiety-related alert barking, territorial barking, etc.

• Leash reactivity/aggression related to underlying fear and anxiety

• Mild isolation distress and/or separation anxiety

• Anxiety related to unfamiliar situations and environments

• Fear and anxiety related to the arrival of unfamiliar visitors (dogs and pets) at home

• Stress related to car or plane travel

• Crate or pen training

• Puppy socialization (encounters with people, objects, dogs, cars, new environments)

• Major transitions (a move, a new baby, a new pet in the home)

• Distracting environments where your dog has problems with focus and attention (the mall, the park, Starbucks, group classes, etc.)

• Psychological discomfort/anxiety related to post-surgical recovery or trauma• Dogs that are timid or that startle easily

• Distress caused by loud noises, i.e. thunder or fireworks

Can you tell when your dog is feeling uncomfortable, stressed, or anxious?

Dogs use a variety of body language signals to communicate how they are feeling. To an untrained eye, it’s easy to misinterpret a dog’s body language. Many people assume their dog is ignoring them when he or she is simply feeling a little stressed.

Though there are many ways for dogs to signal fear, anxiety, and stress, it’s common for most dogs to exhibit certain body language signals more than others. It’s important to observe your dog to determine what signals he or she most commonly uses to indicate that he’s uncomfortable, stressed, or anxious.

Dogs use a wide variety of calming signals for several reasons: to calm themselves when they are stressed or uneasy, to diffuse tensions with dogs and people, and to convey friendly intentions.

Calming signals include (but are not limited to): nose licking, ground sniffing, frequent yawning, turning the head and/or body away from people or other dogs, shaking and trembling, pinned ears, tucked tail, disinterest in food, pacing, excessive panting, dilated pupils, and lethargic behavior.

Calm dogs are physically and psychologically healthy. Here are some tips to make sure your dog is at his best:


Training Tip of the Month: Define Your Training Objectives! 

I have many clients who call me in distress and tell me that their dog is “out-of-control,” “unruly,” or just plain “disobedient.” As valid as their concerns are, I will always ask: in what specific situations or circumstances is your dog unruly and out-of-control, or in what specific way is your dog being disobedient? 

Does your dog destroy your furniture while you are away? Does he run amok in the home and bowl people over? Does he bounce off guests as they enter the door? Does he bark excessively? Does he counter surf at every opportunity? Does he ignore you when you call him? Is he unable to respond because he is a wiggly, overly energetic pup with a very short attention span?

Be specific and detailed; jot down notes about areas of concern. Once you understand your dog’s specific issues, you can decide upon appropriate replacement behaviors (calm greetings with paws on the floor, a quick response to your recall cue, a dog that is able to respond to you regardless of distractions).

Now that you have defined your training objectives, you must decide whether your dog requires in-home training or a group class. Private training in your home is the only practical and effective way to address most behavioral concerns. Dogs are “situational” learners, so issues like potty training, separation anxiety, fear aggression, destructive chewing/digging, and difficult interactions or aggression with family members, (often kids and other pets), need to be addressed at home.

Private training is also best for distractible pups or for those that cannot yet attend group class due to vaccination/age requirements. In the vast majority of cases, the earlier you start training your puppy, the better! Training as early as eight weeks of age will prevent problem behaviors from occurring or becoming difficult to modify.

On the other hand, if your dog is able to focus around distractions (people and other dogs), is vaccinated, and only requires basic obedience (“sit,” “down,” “come,” etc.), a small group class with friendly dogs might be just the ticket.

In short, clearly define your training objectives, and decide upon the best training environment for your dog before starting any training program. Help your dog by setting him up to succeed!

For more helpful training tips, check out my facebook page at Wonder Dog Training!

Summer Road Trips with Fido

Summer is just around the corner. The kids will soon be out of school, and the wide open road beckons! It’s time to take that long-awaited road trip with the family, which of course includes your favorite furry friend!

Before you go, here are a few important tips to remember.

Safety and Planning Tips:

1) It’s safer for everyone if your dog is securely fastened or confined during car trips. Consider a soft sided, easy to carry, collapsible crate safely secured in the car, or a dog vehicle harness with seat belt attachment or anchor. Harnesses offer the advantage of allowing your dog to move, but not to the point of causing safety issues. Be sure to secure your dog in the backseat. Dogs can be seriously injured if you have an accident and an airbag deploys.

2) Microchip your dog prior to leaving home, and make sure his ID tag info is up-to-date and includes your cell phone number. You may also want to check out the new facial recognition app for locating Fido. With this new app, it’s a cinch to map your dog’s facial features and register him with Finding Rover in case he ever gets lost.

3) You have heard it before, but it bears repeating! Never leave your dog in the car unattended. Temperatures can rise very rapidly in a short time and be life threatening.

4) Locate animal emergency clinics along your route ahead of time. A first aid kit including natural calmatives such as ginger (for soothing an upset tummy) may also come in handy. Dog appeasing pheromone spray can also help ease your dog’s anxiety. Just spray it on a bandana and have your dog wear it during the trip. Studies show that dog appeasing pheromone spray works as well as Clomicalm (the most often prescribed drug for anxiety), but has no side effects!

5) Does your dog love to flap his ears in the breeze? Then it’s a good idea to invest in a pair of eye goggles (or doggles) to protect his eyes against flying dirt and debris. He will thank you and look WAY too cool all at the same time. (Think Snoopy WWI flying Ace).

6) Bring a spill-proof water bowl, plenty of fresh water, and some durable long-lasting chew toys to keep him happily occupied along the way.

Training Tips:

1) Teach your dog to remain calm, and “wait” or” stay” until you are certain he will be safe upon exiting.

2) Train your dog to eliminate on cue in areas other than the backyard. Use a specific cue, like “go hurry” just before your dog eliminates, and then praise and treat to reinforce the behavior. Teaching your dog to eliminate on cue will allow for faster bathroom breaks at rest stops.

3) Teach your dog how to jump up into your vehicle on cue. For large senior dogs or for those that cannot easily get into your vehicle, a folding ramp can be a great help.

4) Socialize your dog well and make sure he is comfortable and happy in a variety of situations before taking him on a long trek. Take him with you on local trips around town, when running errands , or when visiting friends. Frequent trips to the park, beach, and a couple of outdoor dog-friendly restaurants or coffee shops will make things a lot easier on both of you when you have your summer adventure.

Road Trip! 🙂


Ian Dunbar TED Talk

In this short video, Ian Dunbar discusses how to train your dog using positive reinforcement, rather than punishment. Dunbar helps us see training through our dog’s eyes, and talks about how to become better leaders and communicators. He stresses the importance of making training fun and motivating for your dog, rather than focusing all your time and attention on the negative. Much wisdom here. Enjoy! 🙂